
Configuring the Alyce Salesforce 2.0 Integration
Please review our Quick Start Guide: Alyce for Salesforce Integration to ensure you have taken the necessary steps before configuring.
Updating integrations settings requires that you have Admin permissions for your Organization. Please reach out to your CSM for assistance if you do not see these options.
This instruction guide is for versions of the Alyce for Salesforce package 2.0.0 or greater (the New Experience).
Alyce for Salesforce
Version 2.0 or higher
- Step 1: Security Settings
- Step 2: Alyce Authorization
- Step 3: Authorize connection with Salesforce
- Step 4: Organization Settings
- Step 5: Automated Campaign Member Statuses
- Step 6: Automated Lead Creation
- Step 7: Automated Campaign Creation
- Step 8: Gift Invitation Layout Setup
- Step 9: Setting Up Alyce Specific Layouts
Alyce Admin Panel Set Up
 Configuring Admin Panel Sections
All steps listed below require clicking the "Modify" button in each step's box to reveal the step in full.
Step 1: Security Settings
Provide Salesforce users with access to Alyce.
Note: You may see a red alert message in this section, highlighting that you need to add the permissions set for the integration user. Don't be alarmed! This step will perform that task.
Starting with Alyce for Salesforce package 2.0.0, an additional permission set is needed to enable real-time updates for gifts and campaigns.
To enable this new permission set, select “Assign Alyce Integration User Permission Set” to successfully add the Alyce Integration User Permission Set. This permission set should be added to the Salesforce user who is updating the Alyce + Salesforce integration.
After clicking “Assign Alyce Integration Use Permission Set”, you will be redirected to the settings page for this permission set. On this page, you will need to take the following steps:
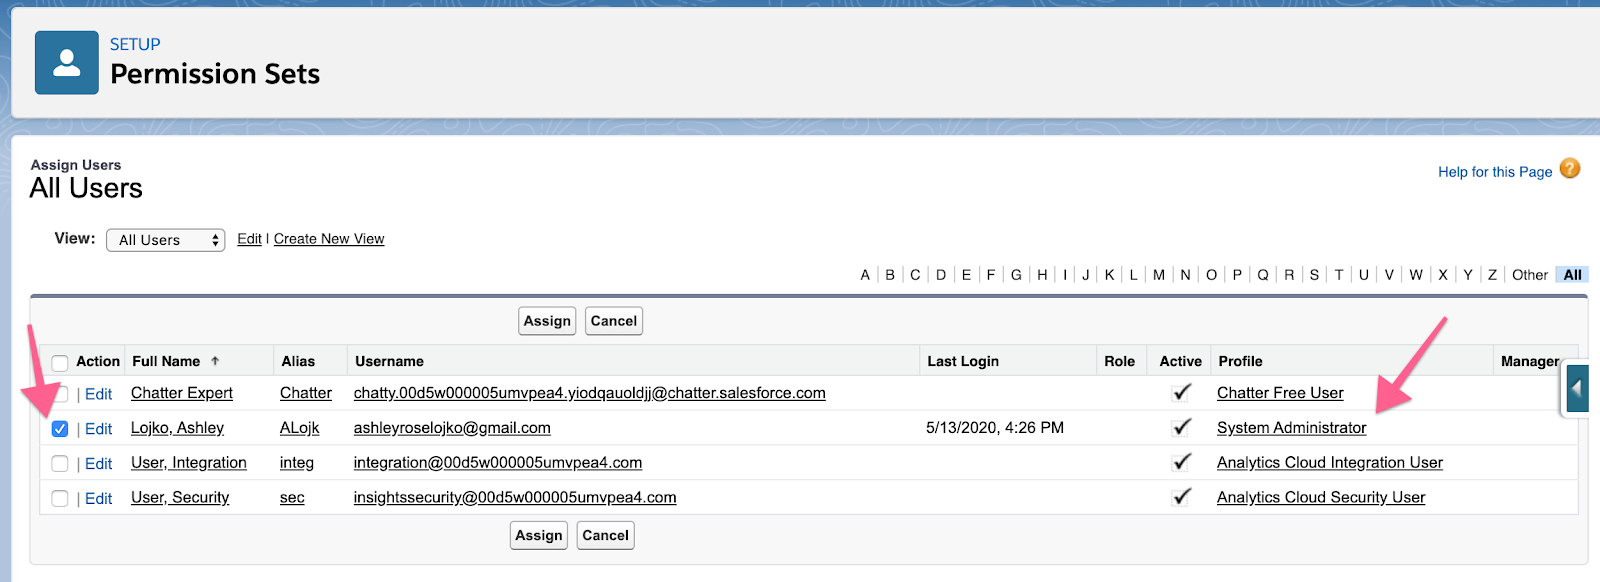
- Click “Manage Assignments”
- Click “Add Assignments”
- Find the user to whom you would like to assign the permission set, check the box next to their name, and click “Assign”.
- Click “Done”.
Select "Add Alyce Permission Set For All Users" (and continue to Step 2)
OR
Select "Custom Setup" to grant the Alyce permission set to the system administrator (yourself), as well as all users who will be leveraging Alyce. If you are unsure of who should get these permissions, please confirm internally with your internal Alyce champion.
Before Users can send an Alyce gift, they will separately need both an Alyce.com account and invitations allocated to them by your Alyce program Admin.
The Alyce Permission Set is necessary for all users that will use the Alyce package. This permission set provides read/write access to all fields managed by the Alyce package, including Alyce fields on the Account, Contact and Lead objects. No additional action should be taken to set field level security and nothing should be set at the profile level. To make fields read-only (recommended), please update the fields when configuring page layouts in Classic and/or Lightning.
 For Custom Setup ONLY:
After clicking "Custom Setup", click on "Manage Assignments" in the resulting window.
Click "Add Assignments" to add the Alyce permissions set to specific team members or user types.
Note: Users already in the list have have the Alyce permission set. They do not need to be added.

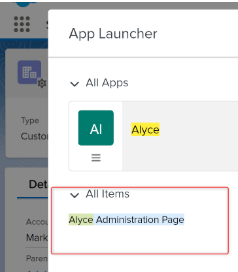
Navigate back to App Launcher -> Alyce -> Alyce Administration Page to continue to Step 2. (If in Classic, use + button in Navigation to access Admin Page)
Step 2: Alyce Authorization
Authorize Salesforce to make the connection with Alyce.
You MUST provide Alyce with your Salesforce Org ID. If we do not have this, you will not be able to connect Salesforce to Alyce.
For a Sandbox / UAT / QA installation, you MUST update your Alyce endpoint before proceeding.
The User will need the Salesforce Admin profile, else the "Edit Authorization Setting" button will not appear.
Click "Edit Authorization Setting"

Open an additional browser tab. Navigate to the appropriate URL below dependent upon which Salesforce environment you are installing to. If not already logged into Alyce, you will be prompted to do so.
Production: https://dashboard.alyce.com/settings/organization/integrations
Sandbox / UAT / QA : https://dashboard-sandbox.alyce.com/settings/organization/integrations
The Alyce sandbox is only accessible with credentials provided by your Alyce Solution Consultant or CSM. Please notify [email protected] of any Users who require sandbox access.
On the resulting page click "Connect" 
Salesforce Key > Client ID
Salesforce Secret > Client Secret
Do NOT close the Alyce window until you have successfully copied the Key and Secret to Salesforce. The ability to copy is ONLY available upon generation / regeneration.


Click "Save Authorization Setting" and ensure the "Current status" field reads "Authorized".

Step 3: Authorize connection with Salesforce to enable Alyce to pass data to Salesforce via API
Within the Alyce Organization Settings, click “Authorize Connection” and then authenticate with your Salesforce credentials. This is the same page that you visited in Step 2 above and the links are included below.
Production: https://dashboard.alyce.com/settings/organization/integrations
Sandbox / UAT / QA : https://dashboard-sandbox.alyce.com/settings/organization/integrations
When prompted, elect to “Allow” data to pass to Salesforce. After authenticating with Salesforce in this way, your gifts and campaigns will sync between Alyce and Salesforce in real time.
This step will need to be done with the same Salesforce user whom you designated to receive the Alyce Integration User Permission Set in Step 1.

Step 4: Organization Settings
Configure the settings that enable the flow of data between Alyce and Salesforce.
Click "Edit Organization Setting" to make the desired selections.
Recommended selections:
- Enable Account, Contact and Lead gift information updates based on gifting flow
- Migrate gifts from lead to contact after lead conversion
- Automatically add Alyce campaign member statuses to new Alyce campaigns
- Automatically add Alyce campaign member statuses to new Alyce campaigns (available in version 2.2).
Check the desired boxes and click "Save Organization Setting" 
- Disable external connection of gift records to Salesforce lead/contact.
- Created gifts will NOT push into Salesforce. Required only if your company leverages Salesforce Shield Encryption, not recommended otherwise. This option disables gift syncing but still allows gift sending from within Salesforce.
- Enable updating of gift information in automatically created fields for Alyce within the Contact, Lead, and Account objects.
- Authorizes Alyce to push gift information from Alyce into Salesforce in the listed objects. If you choose not to enable, no gift data will be pushed from Alyce into Salesforce on these objects, only the Alyce Gift object.
- Migrate gifts from lead to contact after lead conversion
- When you convert a lead to a contact in Salesforce, any Alyce gift data associated with that lead will move to the contact record automatically.
- Automatically add mapped campaign member statuses to new Salesforce campaigns.
- This is required if you plan to leverage campaign member statuses that are mapped to Alyce statuses to show performance of a campaign. Step 5 will help you set up the mapping.
- Dynamically sync new campaign members created in Salesforce gifting campaigns with Alyce (available in version 2.2)
- This is required if you plan to manually connect Salesforce campaigns from Salesforce to Alyce (Option 2 in this article). By checking this setting, as new campaign members are added to your Salesforce campaign, they will dynamically be added to the corresponding Alyce campaign.
Step 5: Automated Campaign Member Statuses
Allow Alyce to match your campaign status with the Alyce gift status.
- Click "Edit Automated Campaign Member Status Setting"
- Check "Enable campaign member status changes based on gifting flow"
- Pair your custom Salesforce "Campaign Member Status" with the appropriate Alyce "Gift Status"
It is highly recommended that you create new Campaign Member Statuses specific to Alyce campaigns.It is unlikely your existing statuses will be a good fit.
Any custom Salesforce Campaign Member Statuses need to be created before this mapping exercise. After those status are added to a campaign (could be a dummy campaign), they become available for mapping here in Step 5 of the Alyce Administration Page.
Custom Campaign Member Statuses will be automatically added to any campaigns created in Alyce (synchronized to Salesforce) if Step 7: Automated Campaign Creation is enabled.
We recommended setting your Default campaign member status in Salesforce to be your custom status that corresponds with "Gift is being researched".
EXAMPLE ONLY. Please work with Alyce and your internal team to ensure the necessary statuses are created and mapped.

Don't know how to set up a custom Campaign Member status? Read more on Salesforce Help.
Here is the list of Alyce Gift Statuses and what they mean:
| Alyce Gift Status | Definition |
| Gift is being researched | Alyce gift created |
| More information needed | Alyce needs more information on the recipient |
| Gift selections ready | Gift options ready to be viewed |
| Invite email bounced | Email was returned as undeliverable |
| Gift invitation sent | Alyce gift invitation was sent to recipient |
| Invite delivered | Alyce physical gift invitation was delivered |
| Recipient visited gift page | Alyce gift invitation viewed by recipient |
| Recipient accepted gift | Alyce gift accepted by recipient |
| Gift expired | Alyce gift expired |
| Gift rejected | Alyce gift declined by the recipient |
| Gift disabled | Alyce gift disabled or deleted |
| Gift invitation scheduled | Alyce gift invitation scheduled to be sent (ver 1.86+) |
Step 6: Automated Lead Creation
Enable Alyce to create a lead within Salesforce when one does not exist for a gift recipient.
- Click "Edit Automated Lead Creation Setting"
- Check "Enable Alyce to automatically create leads in Salesforce when no lead or contact exists for a gift invitation recipient."
- If your Lead creation has required fields, click "Add Required Field" and define the Default Value. NOTE: Alyce will automatically populate values for FirstName, LastName, Email, and Company. No default mapping for those fields is required.
Step 7: Automated Campaign Creation
Enable Alyce to create a campaign in Salesforce when one is created in Alyce. Click "Enable Alyce to automatically create campaigns in Salesforce"
- If your Campaign creation has required fields, click "Add Required Field" and define the Default Value.

Step 8: Gift Invitation Object Layout Setup
Step up the Alyce Gift custom object
The Alyce Gift custom object stores Alyce gift record information in Salesforce. For more details on the components of the Gift Object, please reference this article.

- Click Deploy Metadata from Non-Certified Package Versions via Apex in the text
- Ensure that only the first box is checked.
- Click Save.
- Check the deployment status before moving forward by clicking the green button that reads "Gift Invitation Layout Set Up". The screen will indicated "Deployment Succeeded" and that the Source Name Prefix = alycecom.


Step 9: Setting Up Alyce Specific Layouts - Contact, Lead and Account
The last step of getting the Alyce elements into Salesforce is configuring the "Send Alyce Gift" button for the lead and/or contact record, as well as adding some of the Alyce gift object fields to the lead, contact and account records for reps to see information at fast glance.
Please click the button in Step 9 as pictured below or visit "Adding Alyce Components to Salesforce Page Layouts" for Classic or Lightning to complete this important step.

Follow the steps here to test your integration
Congrats - the Alyce Salesforce package is now successfully configured!